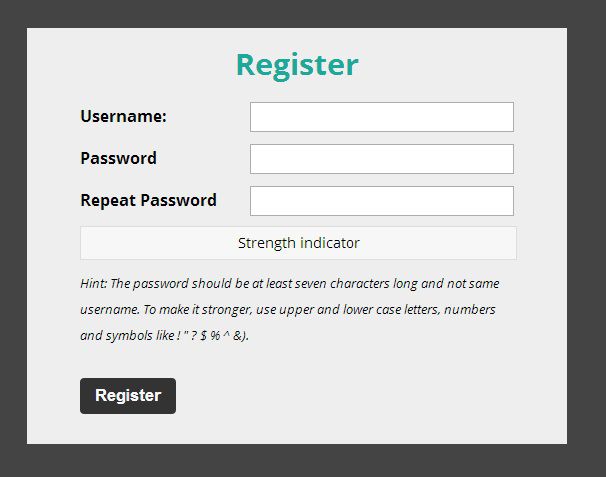
Trong bài này mình sẽ hướng dẫn các bạn cách tạo một “thước đo” đô mạnh của password bằng jQuery trên một form đăng ký đơn giản rất dễ dàng để bạn có thể thêm nó vào các website của mình.
HTML – CSS
Đầu tiên ta tạo một form đăng ký đơn giản.
<div class="RegisterBox">
	<h2>Register</h2>

	<form action="" method="post">
		<p>
			<label for="username">Username: </label>
			<input type="text" name="user" id="user">
		</p>

		<p>
			<label for="pass1">Password</label>
			<input type="password" name="pass1" id="pass1">
		</p>

		<p>
			<label for="pass2">Repeat Password</label>
			<input type="password" name="pass2" id="pass2">
		</p>

		<div id="pass-strength-result">Strength indicator</div>

		<p class="hint">
			Hint: The password should be at least seven characters long and not same username. To make it stronger, use upper and lower case letters, numbers and symbols like ! " ? $ % ^ &).
		</p>

		<p>
			<input type="submit" value="Register" id="reg_btn" name="reg_btn">
		</p>
	</form>
</div>
Và style cho nó bằng css
{ margin: 0; padding: 0;}

body {
  background: #444;
  font: 16px/32px "Open Sans";
}

.RegisterBox {
  width: 500px;
  margin: 30px auto;
  padding: 20px;
  background: #eee;
}
.RegisterBox h2 {
  text-align: center;
  color: #1da999;
  margin-bottom: 20px;
  font-size: 30px;
}
.RegisterBox form {
  width: 435px;
  margin: 0 auto;
}
.RegisterBox form p {
  margin: 10px 0;
}
.RegisterBox form p label {
  width: 170px;
  float: left;
  font-weight: bold;
}
.RegisterBox form p input[type="text"], .RegisterBox form p input[type="password"] {
  padding: 5px;
  width: 250px;
}
.RegisterBox form p input[type="text"]:focus, .RegisterBox form p input[type="password"]:focus {
  outline: none;
}
.RegisterBox form p input[type="submit"] {
  padding: 8px 15px;
  border: none;
  background: #333;
  font-size: 17px;
  margin-top: 20px;
  -webkit-border-radius: 4px;
  -moz-border-radius: 4px;
  color: #fafaff;
  font-weight: bold;
  cursor: pointer;
}
.RegisterBox form p.hint {
  font-style: italic;
  font-size: 13px;
  line-height: 26px;
}
.RegisterBox form #pass-strength-result {
  border: 1px solid #DDD;
  text-align: center;
  margin: 10px 0;
  width: 100%;
  font-size: 14px;
  background-color: #f7f7f7;
  display: block;
}
.RegisterBox form #pass-strength-result.bad {
  background-color: #ffb78c;
  font-weight: bold;
  border-color: #ff853c !important;
}
.RegisterBox form #pass-strength-result.good {
  background-color: #ffec8b;
  font-weight: bold;
  border-color: #ffcc00 !important;
}
.RegisterBox form #pass-strength-result.short {
  background-color: #ffa0a0;
  font-weight: bold;
  border-color: #f04040 !important;
}
.RegisterBox form #pass-strength-result.strong {
  background-color: #c3ff88;
  font-weight: bold;
  border-color: #8dff1c !important;
}
Và đây là kết quả có được với HTML – CSS

jQuery
Tạo file script.js, thêm nó sau file jQuery và thêm vào cuối đoạn html vừa làm
<script src="js/jquery-1.9.1.min.js"></script>
<script src="js/script.js"></script>
Trong file script.js bắt đầu với jQuert.ready
jQuery(document).ready(function($) {
    // code in  here
})
Vì “thước” này chỉ làm việc khi có javescript nên ta thêm display: none; thay cho display: block; trong phần CSS của #pass-strength-result và thêm phần JS đoạn sau để “cây thước” chỉ hiện khi có javascript
strengthResult = $('#pass-strength-result');
strengthResult.show();
Đầu tiên bằng cần thêm hàm passwordStrength vào script.js, hàm này có tác dụng là kiểm tra độ mạnh của password, hàm này mình lấy trong thư viện javascript của WordPress.
function passwordStrength(password1, username, password2) {
        var shortPass = 1, badPass = 2, goodPass = 3, strongPass = 4, mismatch = 5, symbolSize = 0, natLog, score;

        // password 1 != password 2
        if ( (password1 != password2) && password2.length > 0)
            return mismatch

        //password < 4
        if ( password1.length < 4 )
            return shortPass

        //password1 == username
        if ( password1.toLowerCase() == username.toLowerCase() )
            return badPass;

        if ( password1.match(/[0-9]/) )
            symbolSize +=10;
        if ( password1.match(/[a-z]/) )
            symbolSize +=26;
        if ( password1.match(/[A-Z]/) )
            symbolSize +=26;
        if ( password1.match(/.,[,!,@,#,$,%,^,&,*,?,_,~,-,(,),]/) )
            symbolSize +=26;
        if ( password1.match(/[^a-zA-Z0-9]/) )
            symbolSize +=31;

        natLog = Math.log( Math.pow(symbolSize, password1.length) );
        score = natLog / Math.LN2;

        if (score < 40 )
            return badPass

        if (score < 56 )
            return goodPass

        return strongPass;
    }
Cụ thể hàm này sẽ kiểm tra xem trong password nhập vào có thỏa các tiêu chí đặt ra hay không, như: có ký tự thường, ký tự in hoa, ký tự số, ký tự đặc biêt và dựng vào đó để đánh giá độ mạnh của password. Hàm cũng giúp ta kiểm tr việc nhập lại password có giống nhau không.
Tiếp theo, để đánh giá độ mạnh của password khi người dùng nhập vào ta cần xử lý sự kiện .keyup trong jQuery khi nhập giá trị vào 2 input box với id là pass1, pass2.
$('#pass1').keyup(function(e) {
    e.preventDefault();
});

$('#pass2').keyup(function(e) {
    e.preventDefault();
});
Khi Password được nhập thì ta dùng jQuery lấy giá trị của #pass1, #pass2, #user và dùng hàm passwordStrength để lấy kết quả kiểm tra. Thêm vào .keyup của #pass1
user = $('#user').val(); pass1 = $('#pass1').val(); pass2 = $('#pass2').val();
result = passwordStrength(pass1,user,pass2);
Từ kết quả của hàm passwordStrength ta so sánh như sau:
- result = 1 => Password quá ngắn, không nên dùng
- result = 2 => Password ngắn, bảo mật thấp
- result = 3 => Password có thể sử dụng, bảo mật trung bình
- result = 4 => Password tốt mạnh, nên dùng
- result = 5 => Password 2 nhập lại không trùng với Password 1
Từ các giá trị trên ta đưa result vào các if sau:
if (pass1 != ''){
    if (result == 1) {
    strengthResult.removeClass().addClass('short').text('Very Weak')
    };
    if (result == 2){
        strengthResult.removeClass().addClass('bad').text('Weak')
    };
    if (result == 3){
        strengthResult.removeClass().addClass('good').text('Medium')
    };
    if (result == 4){
        strengthResult.removeClass().addClass('strong').text('Strong')
    };
    if (result == 5){
        strengthResult.removeClass().addClass('short').text('Mismatch')
    };
}else{
    strengthResult.removeClass().text('Strength indicator');
}
Tất nhiên ta chỉ so sánh result khi #pass1 có giá trị khác rỗng và nếu #pass1 là rỗng ta trả “thước” về mặc định.
Ta thực hiện tương tự đối với .keyup trên #pass2. Vậy là ta đã hoàn thành.
Bạn có thể xem demo trên CodePen hoặc tải mã nguồn về xem. Có góp ý gì cứ comment ở dưới.